Neo4j dump file
First, download the mako.dump file from the mako releases page. At the time of writing, the last release of a dump file can be found here: release 0.2.1. This file was created by uploading 60 BIOM files and network files to the Neo4j database and then using neo4j-admin to create a dump file. Such a file is much faster to restore a complete database.

The dump file can be written both to a local Neo4j database, and to a Docker file. The former is a bit simpler, but requires you to download the exact Neo4j version used to generate the dump file.
Keep in mind that you need to use a Neo4j version equal to the version that the database was created in, in this case 4.2.0. With the Docker command, you will automatically download and start the correct version. Otherwise, you can select the button in the left bottom corner of the Neo4j Browser to see which version you are running.
Writing the dump file to a local Neo4j database
If you have a running local instance of Neo4j, you can simply use the command below from the neo4j folder. Make sure to adapt the --from file path to the file path where you have saved the mako.dump file.bin/neo4j-admin load --from=/data/mako.dump --database=neo4j --forceUploading dump file to a Docker container
To upload the database, a Docker container needs to be initialized and bound to a local volume. This requires some extra steps to mount the volume and save the dump file there. When you call the Neo4j Docker, do not forget to specify the version name; specifying the wrong version may lead to the database loading incorrectly.If you still have a Docker container with the same name running, stop this container first:
docker stop neo4jOtherwise, use the command below to mount a folder named data and shut down the container after starting it. Make sure the data path matches the path to your dump file, so navigate to this location if applicable!
For Windows:
docker run -d -v
           ./data:/data
           --publish=7475:7474
           --publish=7688:7687
           --name=neo4j
           --env NEO4J_AUTH=neo4j/test
           neo4j:4.2.0
docker run -d -v ./data:/data --publish=7475:7474 --publish=7688:7687 --name=neo4j --env NEO4J_AUTH=neo4j/test neo4j:4.2.0
For Linux and MacOS:
docker run -d -v
           data:/data
           --publish=7475:7474
           --publish=7688:7687
           --name=neo4j
           --env NEO4J_AUTH=neo4j/test
           neo4j:4.2.0
docker run -d -v data:/data --publish=7475:7474 --publish=7688:7687 --name=neo4j --env NEO4J_AUTH=neo4j/test neo4j:4.2.0
Shut down the container:
docker stop neo4j
Next, the mako.dump file is copied from the data folder to Neo4j container. This may give a warning about permissions and the folder not being writable, but the warning should not affect the Docker container.
For Windows:docker cp ./data/mako.dump neo4j:/data/mako.dump
For Linux and MacOS:docker cp data/mako.dump neo4j:/data/mako.dump
Then we restart the Neo4j docker, but append the script so that a bash shell is opened.
For Windows:
docker run -i -v
           ./data:/data
           --publish=7475:7474
           --publish=7688:7687
           -t neo4j
           /bin/bash
docker run -i -v ./data:/data --publish=7475:7474 --publish=7688:7687 -t neo4j /bin/bash
For Linux and MacOS:
docker run -i -v
           data:/data
           --publish=7475:7474
           --publish=7688:7687
           -t neo4j
           /bin/bash
docker run -i -v data:/data --publish=7475:7474 --publish=7688:7687 -t neo4j /bin/bash
From the bash shell, we call the neo4j-admin script and use it to restore the neo4j database from the mako.dump file.
bin/neo4j-admin load --from=/data/mako.dump --database=neo4j --force
exit
To measure the amount of time it takes to run the script, you can also call the below command instead.
%SECONDS=0 ; bin/neo4j-admin load --from=/data/mako.dump --database=neo4j --force ; echo $SECONDSFinally, we can restart the Docker container. Give it a minute or two to restore the database; afterwards, you should be able to interact with it via the Neo4j Browser at http://localhost:7475/browser/. Set the address to
localhost:7688, the username to neo4j and the password to test to connect.docker start neo4j
To remove the container, use the following command:docker container rm neo4j
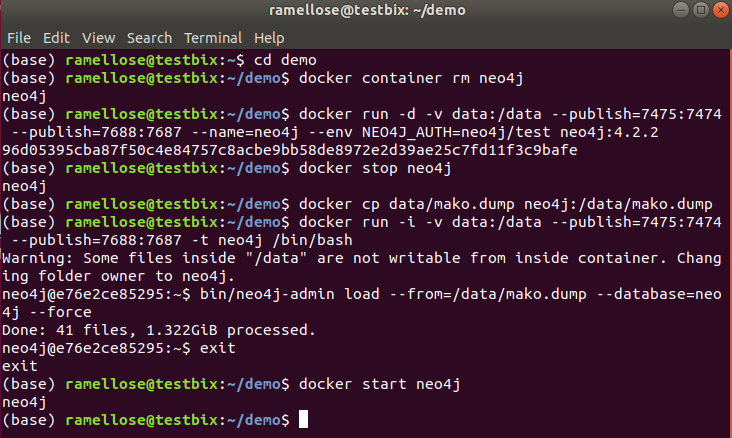
In a Unix environment, the complete sequence to start the database should look something like below: